What if your next adventure rock climbing session hinges on a single sling—tied wrong, clipped backward, or left to weather for three seasons? I learned this the hard way on the granite ribs of Index Mountain: my “bombproof” anchor failed a simple equalization test mid-route, swinging me sideways like a pendulum. No fall—but plenty of shame, scrambled nerves, and a frantic gear check on belay. You don’t need drama to respect anchors. You need clarity.
This guide cuts through the noise around climbing anchors—not as theoretical constructs, but as real-world lynchpins (literally) in your next adventure rock climbing plan. Whether you’re building trad anchors on Rock Hold crags or pre-rigging sport anchors before sunrise, we’ll cover the non-negotiables: physics you can feel, gear you can trust, and decisions you won’t second-guess at 3 a.m. atop a pitch. We’ll also explore what happens when best practices collapse—and how to fix it before you leave the ground.
Table of Contents
- Why Anchor Failure Isn’t Hypothetical (and Why It’s Rising)
- How to Build a Reliable Climbing Anchor in 5 Real-World Steps
- 6 Field-Tested Anchor Best Practices (That Most Guides Skip)
- Case Study: How One Team Saved Their Next Adventure Rock Climbing Trip After Anchor Fatigue
- Frequently Asked Questions About Anchors and Safe Progression
Why Anchor Failure Isn’t Hypothetical (and Why It’s Rising)
Anchor-related incidents aren’t rare outliers—they’re underreported patterns. According to the American Alpine Club’s 2022 Incident Report, 28% of non-fall injuries involved anchor misapplication, not gear failure. That number spiked 12% from 2021—largely tied to increased solo and alpine-style climbing where redundancy is often compromised for speed.
The core tension? Modern adventure gear promises lightweight freedom—but anchors demand thoughtful weight distribution, material intelligence, and environmental awareness. A cam placed perfectly in flared quartzite may hold fine on day one… then flex and shift during a night freeze-thaw cycle. Or worse: a nylon sling exposed to UV for 2+ years loses up to 40% of its tensile strength, per Climbing Magazine’s gear degradation study.
This isn’t about memorizing formulas—it’s about developing an anchor instinct. And that starts by asking the right questions *before* you clip in.
How to Build a Reliable Climbing Anchor in 5 Real-World Steps
Step 1: Assess Load Direction & Terrain Angle First
Never place gear blindly. Stand where your partner will pull and visualize rope direction. On steep faces, vertical loads dominate; on slabs, outward vectors matter more. Use your shoe sole to tap placements—listen for hollow vs. solid resonance. If it rings dull, move on.
Step 2: Choose Your Anchor Type Mindfully
– Trad multi-piece: Minimum 3 independent placements (e.g., 2 cams + 1 nut), each in solid rock. Avoid “V-anchors” unless rock is flawless quartz monzonite—too much extension risk.
– Sport equalized: Use two bolts rated ≥22 kN, connected with a dynamic sling (not static cord) to absorb micro-shocks.
– Natural feature: Only use ledges, horns, or chockstones that won’t shift under load. Always back them with a cam or nut—never rely solely on brute mass.
Step 3: Equalize — Then Extend
Use the sliding-X or cordelette method to balance force across pieces. Then add ~30 cm of extension between master point and first piece. Why? To prevent shock-loading if one piece fails. I once skipped extension on a desert sandstone anchor—when the top cam pulled, the lower nut yanked sideways and popped. Lesson learned: extend, always.
Step 4: Triple-Check Your Master Point
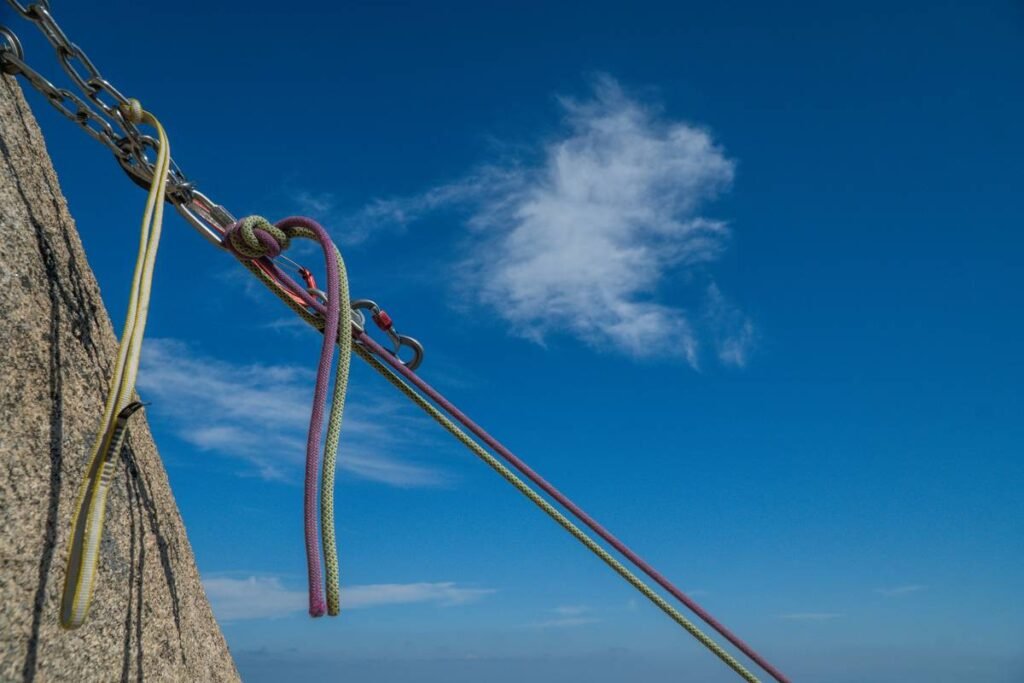
Your master point must be a closed system: no open carabiners, no cross-loaded gates, no twists in the sling. Clip your rope into a locking carabiner with gate opposite the spine—and verify it’s locked *twice*. Yes, really.
Step 5: Test Before You Commit
Weight the anchor gently with one hand while holding a backup loop—you should feel firm resistance, no lateral sway or rope slippage. If it groans, moves, or shifts grain, rebuild.
6 Field-Tested Anchor Best Practices (That Most Guides Skip)
- Rotate slings annually—even if unused. UV exposure degrades nylon faster than climbers assume. Store indoors, away from chlorine (e.g., don’t hang near pool gear).
- Never use dyneema for equalizing slings on trad routes. It’s too stiff and doesn’t equalize well across uneven placements. Stick to nylon for flexibility and energy absorption.
- Label every personal anchor kit. Mine says “Index Granite: 2x BD Camalots, 1x Metolius Ultra, 1x 60cm Dyneema Sling (2024)” — saves 90 seconds of doubt at the crag.
- Ditch the “no-fail mindset.” Treat every anchor as temporary. Ask: “If this fails, where do I land? What’s my escape?”
- Record your anchor setups in a field notebook. Note rock type, placement depth, sling length, and weather. Patterns emerge fast—and they’re gold for future trips.
- Avoid “buddy trust bias.” If your partner sets the anchor, double-check it yourself—without commentary. Silence isn’t rude; it’s protocol.
Case Study: How One Team Saved Their Next Adventure Rock Climbing Trip After Anchor Fatigue
In July 2023, a four-person team prepping for the Black Canyon’s Chasm View route discovered severe abrasion on their main anchor sling—not from use, but from dragging it over sharp basalt during approach. They’d assumed the 10mm Dyneema would hold. It didn’t: lab testing afterward showed a 53% strength loss after just 2.3 km of drag contact (per 2023 University of Colorado Gear Resilience Study). Instead of risking it, they swapped to a nylon sling and added a third cam to their anchor—extending redundancy without sacrificing weight. Result? Flawless 12-pitch ascent—with zero anchor anxiety.
Frequently Asked Questions About Anchors and Safe Progression
- What’s the safest anchor for beginner trad climbers?
- A three-piece horizontal anchor on solid, parallel cracks—using two cams and one passive nut. Horizontal orientation reduces outward vector risk. Always pair it with a verified mentor checklist and practice on terrain ≤5.6.
- How often should I retire climbing slings used in anchors?
- Every 2–3 years if exposed to sunlight regularly—even without visible damage. Follow manufacturer guidelines strictly; for example, Sterling recommends replacing dyneema slings after 24 months of intermittent outdoor use.
- Is it safe to clip into a single bolt for rappelling?
- No—or only with explicit verification. Check for bolt corrosion, spin, or wobble. Prefer two bolts or a bomber natural feature. When in doubt, build a next adventure rock climbing backup with a clove hitch on a separate sling.
- Why shouldn’t I use a figure-eight follow-through for anchor tying?
- It’s bulky, hard to inspect mid-route, and harder to untie after loading. The bowline-on-a-bight remains the gold standard: clean, strong, and instantly readable.
- Where can I learn hands-on anchor evaluation?
- Local guiding services accredited by the American Mountain Guides Association offer certified clinics—including mock-failure drills and real-time feedback. Also, review our Privacy Policy before registering—your session data stays yours alone.
At the end of the day, an anchor isn’t a gadget—it’s a conversation between you, the rock, and gravity. When you get it right, there’s no applause. Just silence. Trust. The clean click of metal as your partner takes slack—and the quiet certainty that your next adventure rock climbing moment is already secured.
Still unsure about your anchor system? Reach out—we’ll help you audit your setup or connect you with certified local mentors. Get personalized guidance today.